Everyone eventually has to start somewhere when they decide to get into the addictive world of kimono. You may have already bought your first kimono and wondered how the heck to put it on. Well, I'm going to walk you through some of the basics to get you on your way to looking like a star.
First, you should familiarize yourself with some of the tools you will need to get dressed. It is much simpler to start with yukata instead of kimono, but I will go over both. But before we can even get started putting on a kimono or yukata, we need to start with the proper undergarments.
First, you should familiarize yourself with some of the tools you will need to get dressed. It is much simpler to start with yukata instead of kimono, but I will go over both. But before we can even get started putting on a kimono or yukata, we need to start with the proper undergarments.
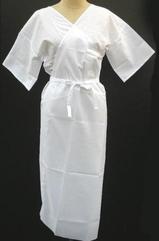
Traditionally, women would wear a hadajuban as their first layer of clothing. It looks something like this
http://www.jendelasastra.com/karya/puisi/hadajuban-dalam-kimono
If you do not have a hadajuban, you can also substitute with a tank top and leggings. The key is to cover as much of your body as possible to protect the outer silk layers of clothing. Make sure that whatever you do wear on your upper body dips at the back of the neck. This is because your kimono collar is pulled down to expose the back of your neck.
On top of this, you may want to wear pads to even out your shape. The ideal body shape for kimono is a straight cylinder to show off the beautiful patterns of the kimono. Unfortunately, no one is shaped like this. So, it is common to wear padding around the small part of the waist, over the butt, on the hollows of the collar bone, and anywhere else that needs "evening out." There are many ways to achieve this, and I will devote a whole article to all the various methods of padding.
Yukata
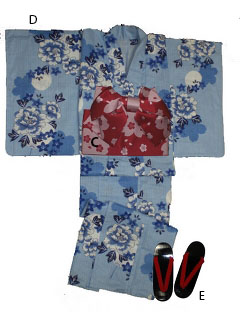
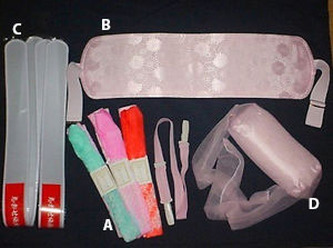
The yukata is a cotton summer kimono worn mostly for festivals and only during the warm summer months. This garment is much simpler than a kimono and has less pieces. Therefore, it is great for beginners. Here is a sample of all the things you might need to wear a yukata. I recommend one of everything, except for the koshi himo. I would suggest you start out with at least three koshi himo.
http://www.jendelasastra.com/karya/puisi/hadajuban-dalam-kimono
If you do not have a hadajuban, you can also substitute with a tank top and leggings. The key is to cover as much of your body as possible to protect the outer silk layers of clothing. Make sure that whatever you do wear on your upper body dips at the back of the neck. This is because your kimono collar is pulled down to expose the back of your neck.
On top of this, you may want to wear pads to even out your shape. The ideal body shape for kimono is a straight cylinder to show off the beautiful patterns of the kimono. Unfortunately, no one is shaped like this. So, it is common to wear padding around the small part of the waist, over the butt, on the hollows of the collar bone, and anywhere else that needs "evening out." There are many ways to achieve this, and I will devote a whole article to all the various methods of padding.
Yukata
The yukata is a cotton summer kimono worn mostly for festivals and only during the warm summer months. This garment is much simpler than a kimono and has less pieces. Therefore, it is great for beginners. Here is a sample of all the things you might need to wear a yukata. I recommend one of everything, except for the koshi himo. I would suggest you start out with at least three koshi himo.

|
|
A: Koshi himo - literally means temporary cord, this is used to tie the kimono shut and hold things in place
B: Obi ita - literally obi stiffener, this is optional but can be used to make the obi straight and wrinkle free in the front
C: Hanhaba obi - a half width obi, the only kind of obi used with yukata
D: Yukata - the main garment, almost always made from cotton
E: Geta - these are casual shoes worn with yukata, no socks necessary
So how do you put this on? Well, the best way to learn how to wear yukata and kimono is to watch videos. Here's a great video on how to wear yukata:
Kimono
If you already have a kimono, or you don't want to start with yukata, you will need a few more tools to get dressed. The kimono is a more formal, all year garment. Kimono can be made from various fabrics, but most common is silk. Based on the fabric and design, each kimono has a seasonality. But this can be very complicated. There will be a future post on seasonality going more in depth about patterns and materials.
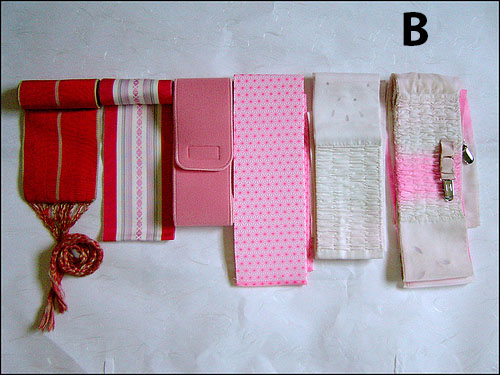
To wear a kimono, here is a sample of the basic things you may need:
|
|
|
|
A. Koshi himo
B. Obi ita
C. Eri shin - a collar stiffiner, this is inserted into the juban collar to give you a nice stiff collar
D. Obi makura - literally obi pillow, this is used in many different obi knots to hold up the fabric of the obi
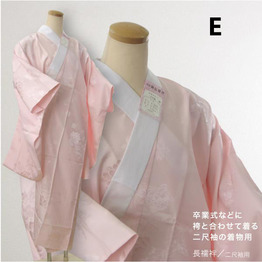
E. Juban - an under kimono, often also made of silk, but can come in many different materials
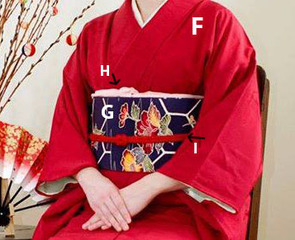
F. Kimono - the actual outside garment
G. Obi - for kimono, there are various forms of obi that are acceptable, namely hanhaba, nagoya, fukuro, and maru
H. Obi age - this covers the obi makura to hide it and is tied above the obi in the front
I. Obi jime - this cord is tied over the obi to hold everything in place
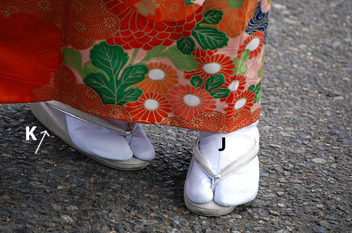
J. Tabi - split toe kimono socks traditionally made of a startched material with metal clasps
K. Zori - formal Japanese shoes
I suggest the same thing as with yukata. You only need one of each item. But I suggest at least 3 koshi himo. For kimono, most people play it safe and get about 5. You can never have too many koshi himo!
There are also a few optional tools which may help you achieve an even more polished look.
B. Obi ita
C. Eri shin - a collar stiffiner, this is inserted into the juban collar to give you a nice stiff collar
D. Obi makura - literally obi pillow, this is used in many different obi knots to hold up the fabric of the obi
E. Juban - an under kimono, often also made of silk, but can come in many different materials
F. Kimono - the actual outside garment
G. Obi - for kimono, there are various forms of obi that are acceptable, namely hanhaba, nagoya, fukuro, and maru
H. Obi age - this covers the obi makura to hide it and is tied above the obi in the front
I. Obi jime - this cord is tied over the obi to hold everything in place
J. Tabi - split toe kimono socks traditionally made of a startched material with metal clasps
K. Zori - formal Japanese shoes
I suggest the same thing as with yukata. You only need one of each item. But I suggest at least 3 koshi himo. For kimono, most people play it safe and get about 5. You can never have too many koshi himo!
There are also a few optional tools which may help you achieve an even more polished look.

|
|
|
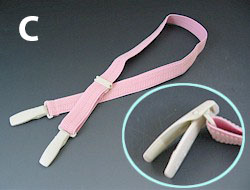
A. Obi clips
B. Date jime - wide flat belt used to keep the kimono in place, it holds the fabric a little better than a koshi himo
C. Korin belt - an elastic belt with clips on the end used to keep the kimono collars in place
Putting on kimono takes a little more effort. Here is a good starter video on how to put on the kimono itself.
And here's a good video on how to tie a very basic musubi (obi knot) called the otaiko.
These are the very basic steps to start wearing kimono. Good luck and have fun!
 RSS Feed
